How to make Auto Readmore with Crop Image in Blogger
RahmanCyber.NET | Blogger - The Auto Readmore function is actually to cut the article on the blogger's main page, why should it be cut? so as not to be too long ...
Indeed, the default is that all articles appear, the drawback is that if the article has a lot of words, it will be very long ... so that's the function of readmore, which is cutting.
In this blogger tutorial, we will discuss it for friends, making auto readmore .. so it will automatically cut, so we don't cut it manually one by one.
Auto Readmore function
To cut articles on the front page of the blog automatically ... so we don't bother cutting one by one.
Auto Readmore Crop Image function
So its function is actually to tidy up the image that appears on the front page. So that the front page becomes neater. For example: SkylightBasic.Blogspot.com
this is what I applied the Skylight Basic template.
Weaknesses of Crop Image
The drawback is the use of Javascript which has the potential to reduce pagespeed ...
Is it possible without Crop Image
Yes, you can, you can, without an image, you can, but if you don't crop it, it looks messy, aka it is not regular because it adjusts the image according to the original dimensions.
How to make Auto Readmore with Cropped Image
We immediately discuss the method, so first of all, please see the appearance of Auto Readmore which I applied in the SKYLIGHT BASIC v1 Blogger Template.
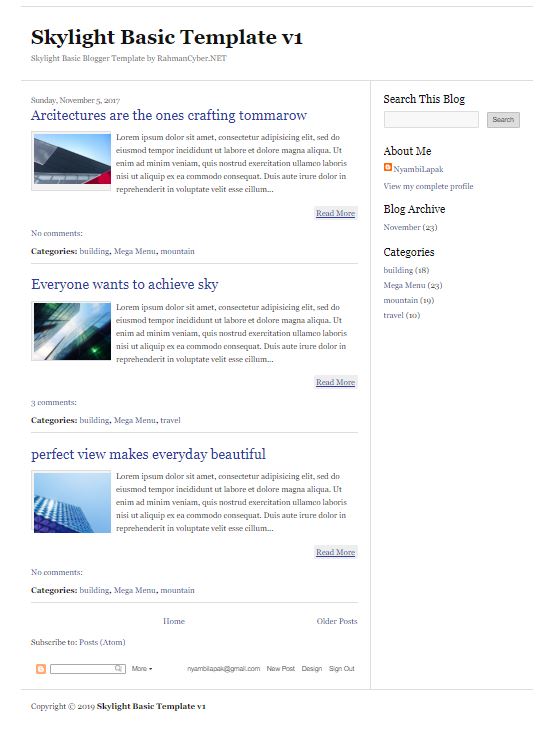
Such is the final result of this Blogger tutorial.
After you see the picture above ... let's follow my steps ...
Please login to Blogger first if you are not logged in -> select the theme or theme -> click the down arrow -> then you select Edit HTML
Look for it
]]> </ b: skin>
, you can use the search facility by pressing Ctrl + F on the keyboard, then type]]> </ b: skin>
after that replace]]> </ b: skin> with the code below:
.skylightcrop-containr{float:left;width:160px;height:120px;border:1px solid #ddd; background:#f3f3f3; margin:0px 10px 1px 0; padding:3px;}
.skylightcrop{overflow:hidden;width:160px;height:120px;border:0px solid #eaeaea;}
.skylightcrop img{margin-top:-6px;margin-left:-6px;opacity:1;}
.skylightcrop img:hover{opacity:.7;}
]]></b:skin>
<script type='text/javascript'>
var thumbnail_mode = "float" ;
summary_noimg = 400;
summary_img = 300;
img_thumb_height = "";
img_thumb_width = 190;
</script>
<script type='text/javascript'>
//<![CDATA[
/******************************************
Auto-readmore - https://rahmancyber.net
********************************************/
function removeHtmlTag(strx,chop){
if(strx.indexOf("<")!=-1)
{
var s = strx.split("<");
for(var i=0;i<s.length;i++){
if(s[i].indexOf(">")!=-1){
s[i] = s[i].substring(s[i].indexOf(">")+1,s[i].length);
}
}
strx = s.join("");
}
chop = (chop < strx.length-1) ? chop : strx.length-2;
while(strx.charAt(chop-1)!=' ' && strx.indexOf(' ',chop)!=-1) chop++;
strx = strx.substring(0,chop-1);
return strx+'';
}
function createSummaryAndThumb(pID){
var div = document.getElementById(pID);
var imgtag = "";
var img = div.getElementsByTagName("img");
var summ = summary_noimg;
if(img.length>=1) {
imgtag = '<span style="float:left; padding:0px 0px 0px 0px;"><div class="skylightcrop-containr"><div class="skylightcrop"><img src="'+img[0].src+'" width="'+img_thumb_width+'px" height="'+img_thumb_height+'px"/></div></div></span>';
summ = summary_img;
}
var summary = imgtag + '<div>' + removeHtmlTag(div.innerHTML,summ)+ '...' + '</div>';
div.innerHTML = summary;
}
//]]>
</script>
after that, please search
<data: post.body />
, you can use the search facility by pressing Ctrl + F on the keyboard, then type <data: post.body />
<!-- START Auto READMORE -->
<b:if cond='data:blog.pageType != "item"'>
<b:if cond='data:blog.pageType != "static_page"'>
<div expr:id='"summary" + data:post.id'><data:post.body/></div>
<script type='text/javascript'>createSummaryAndThumb("summary<data:post.id/>");</script>
<span class='rmlink' style='float:right; margin-top:20px; display:inline'>
<a expr:href='data:post.url' style='padding:5px; background-color:#eee;-webkit-border-top-left-radius: 5px; -webkit-border-bottom-right-radius: 5px; -moz-border-radius-topleft: 5px; -moz-border-radius-bottomright: 5px; border-top-left-radius: 5px; border-bottom-right-radius: 5px;'>Read More</a>
</span>
</b:if>
</b:if>

<b:if cond='data:blog.pageType == "item"'>
<data:post.body/>
</b:if>
<b:if cond='data:blog.pageType == "static_page"'>
<data:post.body/>
</b:if>
<!-- END Auto READMORE -->
calm, for <data: post.body /> it doesn't disappear, so it's already in the code above, just just add it.
After that you SAVE ... and the case is finished, so that's the Blogger Tutorial How to make Auto Readmore with Cropped Images.
That's all, I hope there are benefits ... if not, I apologize., How come you can see the other blog material that we have created at https://www.rahmancyber.net/p/tutorial-pembelajaran-blogger-terbaru.html more structured.
Regards
F.N.A - Red
Post a Comment for "How to make Auto Readmore with Crop Image in Blogger"